Using Terraform with Cloudflare
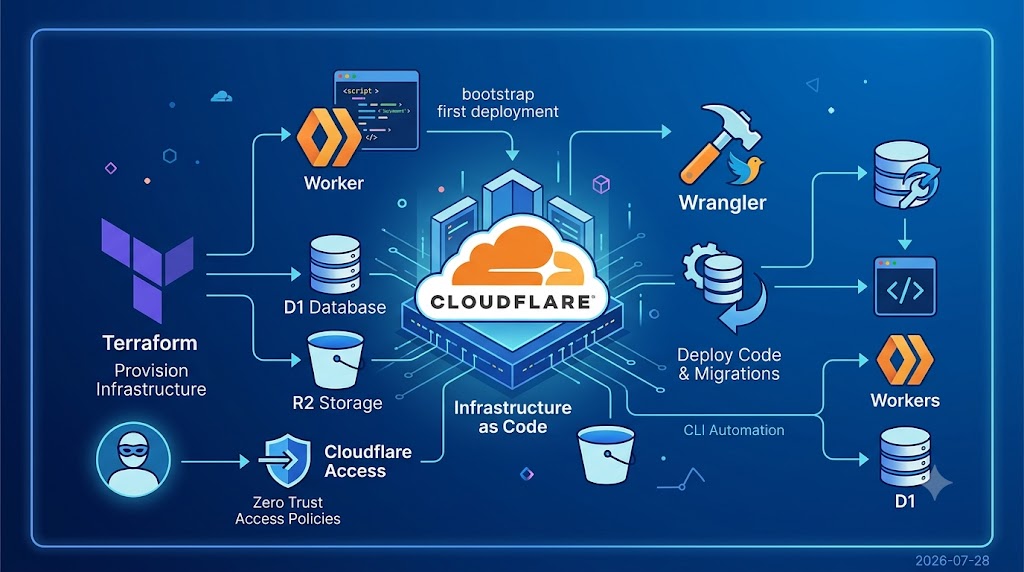
I’ve recently built a series of demo applications on Cloudflare, and each has led me to the same deployment process: create an API token, provision the infrastructure with Terraform, then migrate the database and deploy the code with Wrangler. Terraform handles most of the teardown, although a few edge cases require custom scripts.
This article is about all the little things I’ve learned along the way that go into building on Cloudflare with Terraform.
Using the same API token for Terraform and Wrangler
The first problem I needed to solve was how to reuse the API token across both Terraform and Wrangler. Wrangler uses dotenv environment files to allow configuration, whereas Terraform doesn’t read the .env file. Luckily, there is a Terraform module for that and I use it in every demo.
Every project I have has the following .env file:
# List of required Permissions (based on an Account API Token):## Entire Account:#   Developer Platform:#       <list your permissions here>#       Workers Scripts : Edit#       Workers Tail : Read#   Cloudflare One / Zero Trust:#       Access : Edit# <your-domain>:#   DNS & Zones:#       DNS : WriteCLOUDFLARE_API_TOKEN="<from-dashboard>"CLOUDFLARE_ACCOUNT_ID="<from-dashboard>"
# The domain your applications are going to be linked toCLOUDFLARE_ZONE_ID="<from-dashboard>"DEMO_DOMAIN="<from-dashboard>"
# Your Cloudflare Access team domain, without the https:// prefix.CLOUDFLARE_TEAM_DOMAIN="<from-dashboard>.cloudflareaccess.com"
Every demo I do is hosted under my demo domain and protected with Cloudflare Access. Each of these needs a little bit of configuration. I add a comment to my .env file to ensure I remember what permissions the API token needs.
I use jrhouston/dotenv to convert values from my .env into local variables within Terraform:
terraform {    required_version = ">= 1.15.0"
    required_providers {        cloudflare = {        source  = "cloudflare/cloudflare"        version = "~> 5.22.0"        }        dotenv = {        source  = "jrhouston/dotenv"        version = "~> 1.0"        }    }}
data "dotenv" "config" {    filename = "${path.module}/../.env"}
provider "cloudflare" {    api_token = data.dotenv.config.env["CLOUDFLARE_API_TOKEN"]}
locals {  cloudflare_account_id  = data.dotenv.config.env["CLOUDFLARE_ACCOUNT_ID"]  cloudflare_zone_id     = data.dotenv.config.env["CLOUDFLARE_ZONE_ID"]  cloudflare_team_domain = data.dotenv.config.env["CLOUDFLARE_TEAM_DOMAIN"]  demo_domain            = data.dotenv.config.env["DEMO_DOMAIN"]}
Now I’m ready to roll!
Workers
Terraform owns infrastructure. Wrangler owns the application code and bindings.
It’s tempting to allow Wrangler to own the worker. However, that requires you to split your infrastructure: one thing to deploy some parts of your infrastructure and one thing to deploy other parts of your infrastructure. One of my main goals was to keep all the infrastructure provisioning together.
You will bump into a problem. You cannot connect a domain name to your Worker until you have deployed some code to it. It just isn’t available. The solution to this is to do the first deployment using Terraform and then deploy the real code with Wrangler:
resource "cloudflare_worker" "demo" {  account_id = local.cloudflare_account_id  name       = local.worker_name
  observability = {    enabled = true    logs = {      enabled            = true      head_sampling_rate = 1      invocation_logs    = true      persist            = true    }    traces = {      enabled            = true      head_sampling_rate = 0.1      persist            = true    }  }
  subdomain = {    enabled          = true    previews_enabled = false  }}
resource "cloudflare_worker_version" "bootstrap" {  account_id         = local.cloudflare_account_id  worker_id          = cloudflare_worker.demo.id  main_module        = "index.js"  compatibility_date = "2026-07-27"
  modules = [{    name         = "index.js"    content_type = "application/javascript+module"    content_base64 = base64encode(<<-JS      export default {        async fetch() {          return new Response("Bootstrapping", { status: 503 });        },      };    JS    )  }]
  lifecycle {    ignore_changes = all  }}
resource "cloudflare_workers_deployment" "bootstrap" {  account_id  = local.cloudflare_account_id  script_name = cloudflare_worker.demo.name  strategy    = "percentage"
  versions = [{    version_id = cloudflare_worker_version.bootstrap.id    percentage = 100  }]
  lifecycle {    ignore_changes = all  }}
You can now connect this to your domain automatically:
resource "cloudflare_workers_custom_domain" "demo" {  account_id = local.cloudflare_account_id  hostname   = local.hostname  service    = cloudflare_worker.demo.name  zone_id    = local.cloudflare_zone_id
  depends_on = [cloudflare_workers_deployment.bootstrap]}
When you run wrangler deploy the first time, it will create a new version. However, everything will work just fine since all versions are removed when you tear down the Worker.
After running terraform apply, I have a bunch of ID values that I need to insert into wrangler.jsonc. I have a script called generate-wrangler that takes a wrangler.jsonc.tpl template file and does the substitution for me. Since I am using JavaScript, I have a package.json file:
"scripts": { "deploy": "run-s deploy:infra deploy:worker", "deploy:infra": "run-s deploy:infra:init deploy:infra:apply", "deploy:infra:init": "terraform -chdir=infra init", "deploy:infra:apply": "terraform -chdir=infra apply -auto-approve", "db:migrate:local": "CI=1 wrangler d1 migrations apply DB --local", "db:migrate:remote": "CI=1 wrangler d1 migrations apply DB --remote", "predeploy:worker": "run-s generate:wrangler generate:types", "deploy:worker": "run-s db:migrate:remote deploy:worker:build deploy:worker:wrangler", "deploy:worker:build": "vite build", "deploy:worker:wrangler": "wrangler deploy", // Your additional scripts go here}It’s a lot of scripts, but the basics are:
terraform initterraform applygenerate-wranglerwrangler typeswrangler d1 migrations applyvite buildwrangler deploy
This is where automation saves the day. I would inevitably make a mistake in there somewhere typing it myself!
Cloudflare Access
If you are operating in a Cloudflare One environment, it’s likely every single app you produce is going to be protected by a Cloudflare Access application and policy. You can automate these too. There are two policies I normally use and they look remarkably similar. I can either require authentication (decision = "allow") or I can make it public (decision = "bypass"). Here is the snippet:
resource "cloudflare_zero_trust_access_policy" "access_policy" {  account_id = local.cloudflare_account_id  name       = "${local.worker_name} access policy"  decision   = "bypass" # or "allow"
  include = [{    everyone = {}  }]}
resource "cloudflare_zero_trust_access_application" "public" {  account_id = local.cloudflare_account_id  name       = "${local.worker_name} public library"  domain     = local.hostname  type       = "self_hosted"
  destinations = [{    type = "public"    uri  = local.hostname  }]
  policies = [{    id         = cloudflare_zero_trust_access_policy.access_policy.id    precedence = 1  }]}
There are more complex scenarios, such as a website that has a public home page but a protected area. I’ve got snippets for those as well, but they are worth their own article.
D1 Databases
A complete resource definition for a D1 database:
resource "cloudflare_d1_database" "media" {  account_id = local.cloudflare_account_id  name       = "${local.worker_name}-db"
  read_replication = {    mode = "disabled"  }}
You don’t need the read_replication block on first deploy. However, you will get an error on the second deploy if you don’t add it.
R2 Storage
Here is the Terraform snippet to create a bucket:
resource "cloudflare_r2_bucket" "media" { account_id = local.cloudflare_account_id name = "${local.worker_name}-store"}R2 buckets are easy to create but more difficult to tear down because Cloudflare refuses to delete a nonempty bucket. The documented way of emptying a bucket uses the S3 API to iterate through the objects in the R2 bucket and remove them one by one. You’re going to need some credentials. Terraform can be used if you give your API token permissions to create API tokens:
data "cloudflare_account_api_token_permission_groups_list" "r2_bucket_write" {  account_id = local.cloudflare_account_id  # Names are always URI encoded  name       = "Workers%20R2%20Storage%20Bucket%20Item%20Write"}
locals {  r2_bucket_write_permission_group_id = one([    for g in data.cloudflare_account_api_token_permission_groups_list.r2_bucket_write.result :    g.id if g.name == "Workers R2 Storage Bucket Item Write"  ])}
resource "cloudflare_account_token" "exports_r2" {  account_id = local.cloudflare_account_id  name       = "${local.worker_name}-store"
  policies = [{    effect = "allow"    permission_groups = [{      id = local.r2_bucket_write_permission_group_id    }]    # Bucket-scoped resource form. `default` is the jurisdiction segment    # for buckets created without an explicit `jurisdiction`.    resources = jsonencode({      "com.cloudflare.edge.r2.bucket.${local.cloudflare_account_id}_default_${cloudflare_r2_bucket.media.name}" = "*"    })  }]}
Then in outputs.tf, derive the S3 pair and mark both sensitive:
output "r2_access_key_id" {  value     = cloudflare_account_token.exports_r2.id  sensitive = true}
output "r2_secret_access_key" {  value     = sha256(cloudflare_account_token.exports_r2.value)  sensitive = true}
This allows you to read and write to the R2 bucket, which allows you to delete the contents. You can use the S3 CLI for this:
AWS_ACCESS_KEY_ID="..." \AWS_SECRET_ACCESS_KEY="..." \ aws s3 rm "s3://bucket" --recursive \ --endpoint-url "https://accountid.r2.cloudflarestorage.com"You can also click on the “Empty Bucket” link in the dashboard before tearing down your project. However, this requires an interaction with the dashboard.
Finally, don’t forget about CORS. Some direct browser requests, including presigned uploads with non-safelisted headers, trigger a CORS preflight (OPTIONS) request and R2 rejects it without an explicit CORS policy on the bucket. CORS can be applied with Wrangler or Terraform. The Terraform resource uses []cloudflare_r2_bucket_cors](https://registry.terraform.io/providers/cloudflare/cloudflare/latest/docs/resources/r2_bucket_cors), but I find the CORS setting to be easier via Wrangler.
Create a CORS configuration file:
[ { "allowedOrigins": ["https://your-app.example.com"], "allowedMethods": ["GET", "PUT", "HEAD"], "allowedHeaders": ["Content-Type"], "maxAgeSeconds": 3600 }]Then apply it with the following script:
wrangler r2 bucket cors set my-bucket --force \ --file infra/r2-cors.json \ --config src/workers/wrangler.jsoncAdd this command to the deployment sequence after generating the wrangler.jsonc file.
Ordering teardown
Terraform sets up the infrastructure as independent resources, but Wrangler applies relationships through bindings. The Worker must be removed prior to the dependent resources.
This means you will need to add depends_on statements in your Terraform scripts so that the resources are destroyed in the right order. For instance, you might add a depends_on = [cloudflare_queue.queue] to a Worker to ensure that the Worker is deleted before a queue that is referenced in a binding.
If you fail to do this, Terraform may attempt to delete the resources concurrently. The Cloudflare API will refuse to delete the queue if the queue deletion occurs before the worker deletion because the binding still exists.
Final thoughts
Producing self-contained demos that need to be easily deployed and torn down on a regular basis has taught me a lot about how Cloudflare and Terraform interact. It’s not without problems, but the problems are generally solvable. I hope these hints and tips help you as you use Terraform with the Cloudflare ecosystem.
Comments